Tight hips slowing you down? You can fix that in just 10 minutes. This 10-minute yoga routine for hip flexibility is easy, simple, and gentle. No crowded gyms, no heavy equipment—just moves that open your hips, release tension, and improve movement. Do it daily and feel lighter, stronger, and more flexible. Even small, consistent sessions make a huge difference. Start today and unlock hips you didn’t know were holding you back.
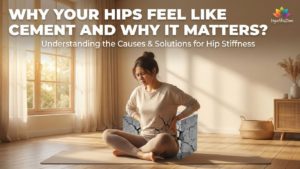
Why Your Hips Feel Like Cement and Why It Matters?
Sitting can freeze your hips into a folded position. Your hip flexors tighten and physically shorten over time. Blood flow is restricted, leading to stiff, dry joints. It feels exactly like cement setting inside you. We often ignore this until moving becomes painful. Your body craves natural movement to stay fluid.
Tight hips wreak havoc on your lower back. Short muscles pull your pelvis forward into a tilt. This drags on your lumbar spine all day long. Pain usually signals that your foundation is weak. Releasing the hips is vital for a healthy spine. You must address the root cause today. To fully address this pain, combine your hip work with these yoga poses to improve back flexibility.
Before You Start What You Need and Safety Tips
You do not need a fancy studio setup. A simple non-slip mat provides the best grip. Keep two yoga blocks nearby for support. Wear stretchy fabrics that move with your skin. Hydrate your body well before you begin. Clear a small, quiet space in your living room.
Here are Some Safety Tips:
- Stop immediately if you feel any sharp pain.
- Breathe deeply through your nose the entire time.
- Never force your body into deep, painful shapes.
- Keep your front knee aligned over your ankle.
- Consult a medical professional before starting new exercises.
- Move slowly and mindfully between every single pose.
Listen closely to what your body tells you. Discomfort means change, but pain signals danger. Respect your limits to build strength safely. Your progress happens with patience.
The 10-Minute Hip Opening Sequence (Step-by-Step)
To safely improve hip flexibility, follow this targeted sequence to support your range of motion. You will start with a warm-up using Cat-Cow and Downward Dog, then move into deep stretching with Low Lunge and Lizard Pose. Finally, you will release muscle tension using Pigeon Pose before cooling down with Happy Baby and Butterfly for a calming finish.
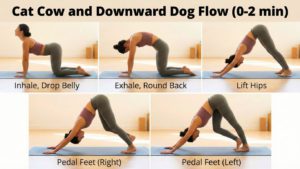
Cat Cow and Downward Dog (0-2 min)
Start your practice by gently waking up the spine and signaling your nervous system to prepare for activity with this dynamic warm-up that lubricates stiff joints.
Here are the processes:
- Start on hands and knees with wrists under shoulders.
- Inhale deeply to look up, then gently drop your belly.
- Exhale slowly to round your back like a cat.
- Lift your hips high into an inverted V-shape.
- Pedal with your feet to slowly stretch out tight calves.
This combination supports healthy blood circulation, encourages a steady breathing rhythm, and lengthens the spine. It’s one of the best simple exercises for hip mobility to start your session safely.
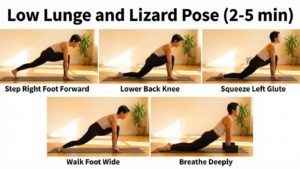
Low Lunge and Lizard Pose (2-5 min)
This movement targets the deep psoas muscle to counteract the tightness caused by prolonged sitting while simultaneously opening the front of your hips. If you feel tightness in the back of your legs during this lunge, check our guide on the best yoga poses for stiff hamstrings.
Here are the processes for this pose:
- Carefully step your right foot forward between your hands.
- Lower the back knee gently to the mat (use padding if sensitive).
- Squeeze the left glute to stabilize your lower back.
- Walk the front foot wide for a deeper stretch.
- Keep the chest open and breathe deeply here.
Gravity assists in this position, allowing your muscles to release naturally from adaptive shortening. Incorporating this gentle hip opener flow helps maintain healthier hip function and reduces discomfort.

Pigeon Pose (5-8 min)
Widely regarded as an effective hip opener, this pose targets the piriformis, a deep gluteal muscle, to help alleviate stored tension.
Here is the process:
- Slide the right knee behind the right wrist.
- Extend the left leg straight back behind you.
- Use a block under the hip to avoid knee strain.
- Walk hands forward and fold down only if comfortable.
- Hold for 1 minute before slowly switching sides.
Proper alignment is crucial here; stop immediately if you feel any sharp sensation in your knee. These specific yoga stretches for tight hips can help reduce strain on the lower back.
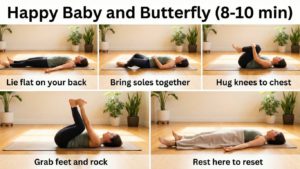
Happy Baby and Butterfly (8-10 min)
Allow your body to cool down with these passive shapes that support parasympathetic relaxation and use gravity to gently open the inner thighs.
Here are the Step-by-step processes:
- Lie flat on your back and relax your spine.
- Bring the soles of the feet together, letting knees open naturally.
- Hug knees to chest for a gentle squeeze.
- Grab the outer feet and rock side to side.
- Rest here to reset your spinal alignment.
This final relaxation phase helps calm the mind and seals the benefits of your practice. It is perfect for morning yoga for stiffness or winding down before deep sleep.
Evidence-Based Benefits of This 10-Minute Hip Routine
You might wonder if just ten minutes is enough to make a difference. General evidence suggests that frequency matters far more than the duration of your practice. Performing simple exercises for hip mobility every day creates lasting positive changes in your connective tissues. You do not need to spend an hour on the mat to see results.
- Measurable Flexibility Gains: Research indicates that daily stretching improves functional range of motion over time. Your muscles adapt safely when exposed to regular, gentle tension.
- Reduced Lower Back Strain: Tight hip flexors often pull on the lumbar spine, leading to discomfort. Practicing a gentle hip opener flow helps release this pressure naturally.
- Safe and Sustainable: Unlike high-impact gym workouts, this routine is low-risk and joint-friendly. It builds functional stability without the common risk of injury.
Small, daily efforts compound into meaningful physical improvements over time. Consistency remains the vital key to unlocking your body’s potential.
Modifications for Beginners and Stiff Bodies
Yoga practice involves much more than simply touching your toes perfectly. Your skeletal structure significantly influences your range of motion. Modifying these simple exercises for hip mobility ensures safety for everyone. Beginners often feel discouraged when dealing with tight hip muscles.
Use props to effectively bring the floor closer to your hands. Blocks act as tools for support, not signs of weakness. They help you maintain proper spinal alignment during every single pose. If the lunge feels unstable, try widening your stance slightly.
For Pigeon pose, remain upright instead of folding forward completely. Place a folded blanket under your hip for essential support. Prioritize keeping a long, neutral spine rather than forcing the legs straight. Modify poses until you can breathe smoothly and deeply throughout.
Knee Pain Alternatives for Sensitive Joints
Knee pain during deep hip yoga signals a clear need for modification. Safety remains crucial when performing deep yoga stretches for tight hips correctly. Sharp sensations often indicate excessive mechanical stress on your delicate knee joints. You must modify active poses to reduce unnecessary stress on sensitive structures.
Here are Some Knee Pain Alternatives:
- Swap Pigeon for the safer Reclined Figure Four.
- Use folded towels under knees during kneeling lunges.
- Practice Lizard pose with the back knee lifted high.
- Place blocks under knees in Butterfly for support.
- Avoid deep knee flexion if any pain persists.
Your long-term joint health must always remain your top priority. Swap active lunges for seated chair stretches if specific pain arises. Protecting your knees ensures you can keep moving for many years.
How to Tell Good Pain from Bad Pain
Understanding physical sensation is crucial for making safe, steady progress. Good pain typically feels like a dull, spreading muscular ache. This sensation usually stops immediately once you release the stretch. It signifies that your muscles are lengthening safely and effectively.
Bad pain feels sharp, electric, or pinching near the joint. This sensation warns you of potential stress on your tissues. Stop moving immediately if you feel this specific warning sign. Never push through sharp, stabbing sensations to force a pose.
Common Mistakes That Kill Your Progress
Many people unknowingly sabotage their results by forcing deep, complex shapes. Forcing depth can activate protective muscle contractions that limit your flexibility. Your body naturally fights back by tightening the target muscles further. Breathing usually stops when we force our bodies into rigid poses.
Avoid These Common Mistakes:
- Holding your breath tightly during deep stretches can cause tension.
- Bouncing specifically to force deeper range risks injury.
- Comparing personal progress to flexible instructors destroys motivation.
- Curving the spine to reach toes compromises spinal alignment.
- Practicing sporadically rather than maintaining daily consistency slows progress.
Relax your jaw to help release held tension in your hips. Patience yields faster results than force ever will in yoga. Trust the process and stay consistent with your daily practice.
How Often Should You Do This Routine
Frequency matters far more than intensity for improving your mobility. Connective tissue adapts slowly over many weeks of consistent practice. Regularly practicing this gentle hip-opener flow supports safe progress. Aim to practice this specific sequence regularly for steady improvements.
This routine works effectively as morning yoga for stiffness relief. Consistent practice helps the nervous system tolerate greater ranges safely. Take a rest day if you feel excessive muscle soreness. Active recovery, like gentle walking, is also helpful for healing.
Snapshot Your 10 Minute Routine Cheat Sheet
Keep this summary handy for quick reference during your practice. Save this page or take a screenshot for future use.
- Cat-Cow (2 min): Warm up the spine effectively by moving with your breath.
- Low Lunge (3 min): Target tight hip flexors safely while squeezing your glutes.
- Lizard Pose (2 min): Deepen the stretch for inner hips while breathing deeply.
- Pigeon Pose (3 min): Release deep tension stored within the glutes using props.
- Happy Baby (2 min): Reset your spinal alignment and calm the mind completely.
Your body changes when you show up daily, not harder. Breathe, modify, and let progress meet you where you are.
FAQs
Can I do this routine every single day?
Answer: Yes, daily practice yields the fastest mobility results. Your connective tissues need consistent signals to lengthen safely. However, even three days a week significantly reduces stiffness and prevents future joint pain.
How long will it take to see real results from flexibility?
Answer: Most people report feeling less tension after two weeks. Visible improvements in range of motion usually take about three months. Flexibility is a biological process that requires patience and steady consistency.
Is it better to do this in the morning or at night?
Answer: Mornings are excellent for relieving stiffness from sleeping. Evenings help release the tension accumulated from sitting all day. Choose the time that best fits your schedule, so you actually do it.
Is this routine safe for seniors or beginners?
Answer: Yes, this flow is low-impact and joint-friendly. Seniors should move slowly and use props, such as blocks. Gentle hip movement is vital for maintaining balance and preventing falls as we age.
Why do my hips feel sore after stretching?
Answer: Mild soreness is normal when waking up dormant muscles. It usually fades within 24 hours as blood flow improves. However, sharp or pinching joint pain is a warning to stop immediately.
Will this routine help with my lower back pain?
Answer: Absolutely, because tight hip flexors pull on the lumbar spine. Releasing the hips removes this constant strain on your back. This addresses the root cause rather than just treating symptoms.
Conclusion
You now possess the tools to unlock your body. Tight hips do not have to be your permanent reality. Regular movement feeds your joints with essential nutrients. It prevents the long-term damage caused by sitting. Commit to this 10-minute yoga routine for hip flexibility today. Small daily actions create massive health changes over time.
Ready to go beyond just 10 minutes? Commit to our 30-day yoga flexibility challenge for a complete body transformation.
Listen to your body as you progress through poses. Never force a stretch beyond your current comfort level. Your range of motion will improve naturally with patience. A pain-free life is built on consistent, gentle habits. Start your journey to better mobility right now. Your future self will thank you for starting today.
Additional Sources Used in This Guide
- PubMed Central (PMC) – Hatha Yoga Flexibility Study
- Harvard Health Publishing – Yoga for Better Health
Disclaimer: This content is for educational purposes only and provides general yoga guidance. Individual needs vary. Consult a certified yoga instructor or healthcare professional before starting this routine.
Reviewed & Compiled by: “YOGA FLEX ZONE” Editorial Team